
the quilt that is testing every ounce of my patience
I've been having a pretty good run of creativity lately. I made a bunch of new quilts (7!!) for my show at Park University in the span of about two months. They all were easy peasy - get an idea, dye the fabric, piece the top, quilt the thing, done. No issues, no ugliness, just a series of good quilts. Then it all went down the drain. There is going to be a Kansas City Art Institute Faculty show in October and of course, I wanted to make a new quilt for it. And of course, it should be kind of big. At first I thought queen size, but there will be 35 of us in the show and a queen size quilt seemed like a space hog. So I went with twin size (65" x 88" ish).
Nothing is going right with this quilt (you can read more about it in my last blog post).
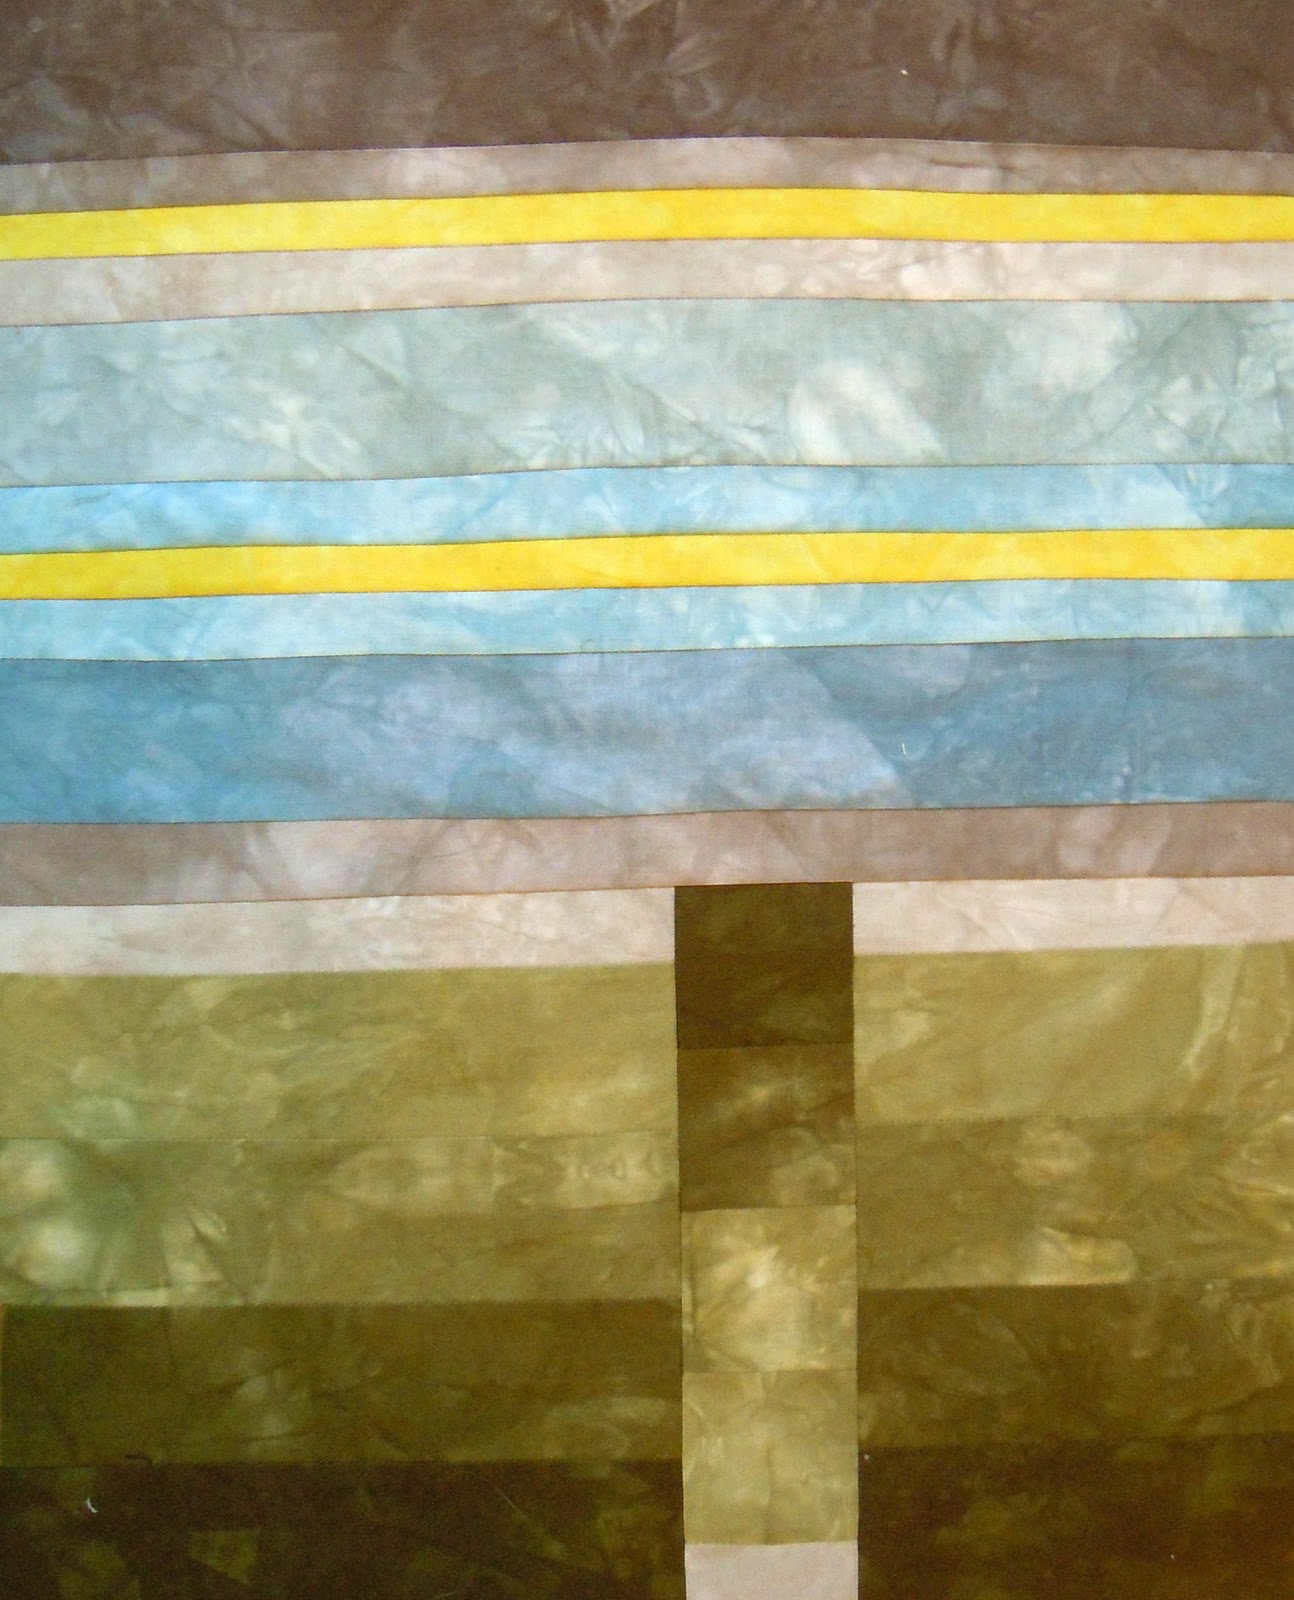
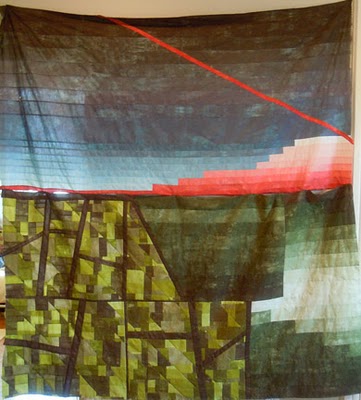 Here it is in phase 3. I didn't take pictures of phases 1 and 2 because I forgot. And they were just too dreadful. To be fair, phase 1 wasn't really that bad. It just wasn't great. You know? It was fine, but boring. Phase 2 was pathetic and looked like I was trying too hard. Phase 3 is everything that happened on Saturday night, if you're following along. I really love the piecing in the lower left quadrant of the quilt. That will have to come back in another quilt, with slightly different colors.
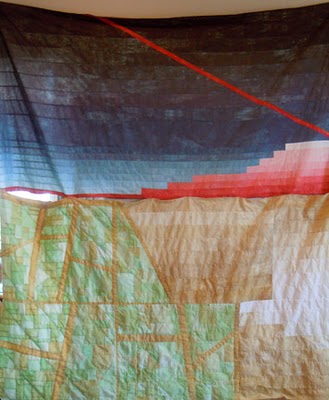 In phase 4 I decided this was a winter quilt. So I dunked the whole bottom half in thiox (a really pungent chemical that strips dye out of fabric) hoping it would turn white. It turned a weird light greenish-tan. I knew that would happen, I'm not sure why I thought thiox would do something different this time, but there it is. So then I thought it would all be magically fixed if I dyed the bottom half a really pale blue color so it would like kind of icy. It didn't. It looked green. Bright, acid green with some sections of pale blue. Gr! So phase 6 was stripping the color out again (!!!) with thiox. Phase 7 was to dye the bottom half black.
 All of the lovely piecing is still there, its just now all brownish and blackish and purplish. This is the thing after I quilted it for the second time. That's right, second time. The first time I quilted the bottom with some green thread that is really very lovely in theory, but in practice it looked like hell so I spent nearly 2 hours ripping out all the quilting. I'm happy. I think. Maybe I'm just happy to be nearly done with it (only binding to go).
Does anyone remember the Barbie doll who would say "math is hard"? There was a commercial for her I think when I was in high school, which would have been the mid 90's. She was annoying and made an even worse role model for girls than she already was. Anyways. Quilting is hard.
Nothing is going right with this quilt (you can read more about it in my last blog post).
Does anyone remember the Barbie doll who would say "math is hard"? There was a commercial for her I think when I was in high school, which would have been the mid 90's. She was annoying and made an even worse role model for girls than she already was. Anyways. Quilting is hard.
What I did on Saturday night.
I worked. That is what I do most Saturday nights...and Friday nights, too. Pretty much every night and every day. Sometimes I waste time watching lame tv on my computer or talking to the cats that live outside while pretending to pull weeds. Sometimes it feels unfair that my work is also my favorite hobby (if you can call it that) because it leaves me very little time for other hobbies and the long list of fun things I would like to do. But then I think "hey! your work is your hobby! that's lucky. don't complain". So anyways. Here is a glimpse into my Saturday night (times are approximate):
6:45 - eat supper with Simon (after working in the sewing room since about 4:00)
7:05 - eat a little more supper because I'm still hungry
7:15 - go into the disaster area that is my sewing room and take a great big breath because it is such a mess and boy am I stressed out
7:17 - start ripping some seams because all the work that I did on Thursday, Friday and Saturday afternoon looked terrible and things need to be rearranged
7:18 - curse quietly to the cats about how much I hate ripping seams as I accidentally rip the fabric
7:19 - get over it and start ripping again. then iron. then trim. then start sewing strips together
7:19 - 8:09 - sew strips together, iron them, cut them up into vertical strips, sew those strips together, repeat until there is a 70" x 30" piece of patchwork fabric
8:10 - stand back and look at what I just did. it's good, but not great. brilliant idea! cut the piece into strips on a 45 degree angle and then rearrange and sew back together.
8:29 - this sucks. what was I thinking? gr. power through. just keep going.
9:47 - done. it is badass. now sew that part onto the rest of the quilt.
10:00 - good! now hang it up and look at it because it's going to be so great and I'm better now than I've ever been before.
10:04 - despair. it looks like crap. the color is all wrong and it is way too busy. damn.
10:04 - 10:13 - sit on living room floor staring at shitty, ugly quilt and having a mini freak out session.
10:13 - 10:18 - eat some nice bread with some lovely strawberry jam and drink some hot tea. talk to the cats about how cute they are and what good kitties they are.
10:18 - unpin the quilt from the living room wall and start seam ripping again
10:19 - 12:17 - frantically seam rip, iron, cut, sew, iron, cut, sew, iron, cut, sew, iron while singing loudly along with Roseanne Cash
12:18 - pin the quilt segments back together, pin to living room wall, step back. still not good, but better. fixable. I can see how to make it good.
12:24 - turn off lights and iron and sewing machine.
12:25 - go to bed.
Quilt Guilt and other non guilty quilts
I have been so busy lately with teaching, getting ready for my show in Parkville, and stuff I'm not supposed to talk about yet. It feels like there aren't enough hours in the day and when I try to make my fingers sew more quickly they won't listen. With all the craziness, I have been working on something I shouldn't. I call it my guilt quilt. I started it a few weeks ago and it was inspired by two quilts in the book Amish Crib Quilts from the Midwest: the Sara Miller Collection that I bought at the International Quilt Study Center last fall. It's a pretty traditional quilt using the Hole in the Barn Door (HIBD) block. Here is a picture in progress on my design wall:
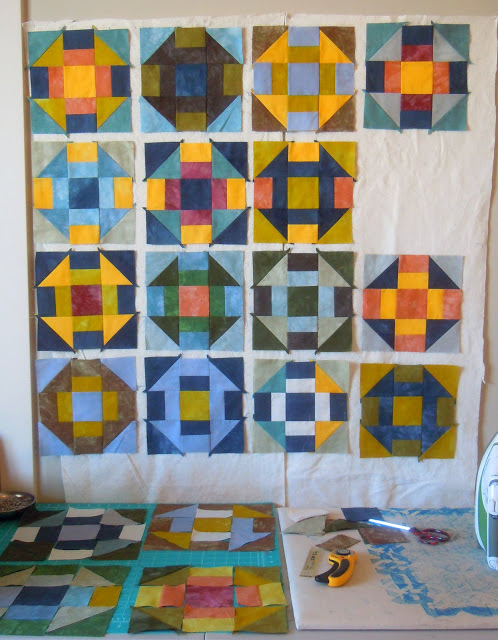 I have a couple of parameters. First, all of the blocks have to be HIBD. Second, I can only use scraps of fabric. That part isn't really too hard because I have a ton of dye mistake fabric - things that I didn't measure right, or made too much, or whatever. Third, I can only spend an hour cutting pieces and then I have to make as many blocks from those pieces as possible before cutting new pieces. That forces me to make decisions I wouldn't normally make such as making things asymmetrical and putting strange colors together. At the end I will put in 1" undyed cotton sashing and it will be a queen size quilt. I'm pretty much in love with Amish quilts and using traditional blocks. This quilt will go on my bed when I'm finished, so I'm thinking of backing it with flannel for extra warmth.
Yesterday I went up to Park University in Parkville, MO to hang my show. Simon went with me and was a big help. I forgot to get a picture of the show all together but I will try to do it before I take the show down in October. I made seven brand new quilts for the show (in less than 2 months) and finished sewing pockets on the back about 15 minutes before we had to leave for Parkville. Last week was the week of very little sleep.
 In some of the quilts, I used the quilting lines to mimic wind or rain or rays of sunshine. You can see the rest at my website: www.eichlermessmer.com. Now I get to cut some more pieces for one hour and then make more HIBD blocks. Yay!!! (totally not sarcastic, I really am very excited.)
Yesterday I went up to Park University in Parkville, MO to hang my show. Simon went with me and was a big help. I forgot to get a picture of the show all together but I will try to do it before I take the show down in October. I made seven brand new quilts for the show (in less than 2 months) and finished sewing pockets on the back about 15 minutes before we had to leave for Parkville. Last week was the week of very little sleep.
Portfolio
To see more of my work, go to my website: kimemquilts.com
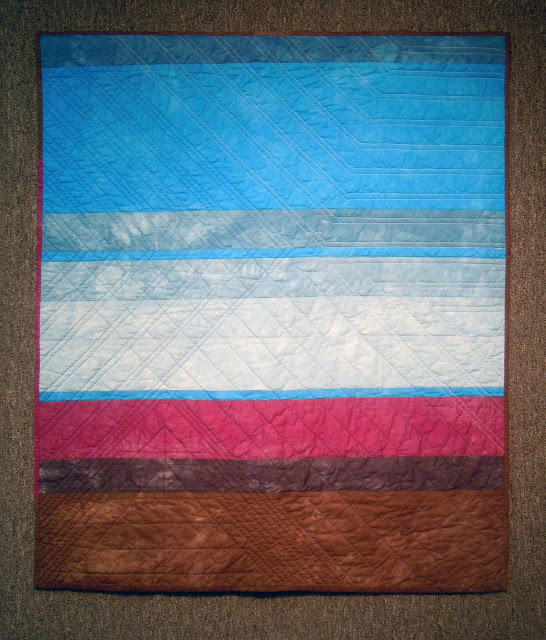
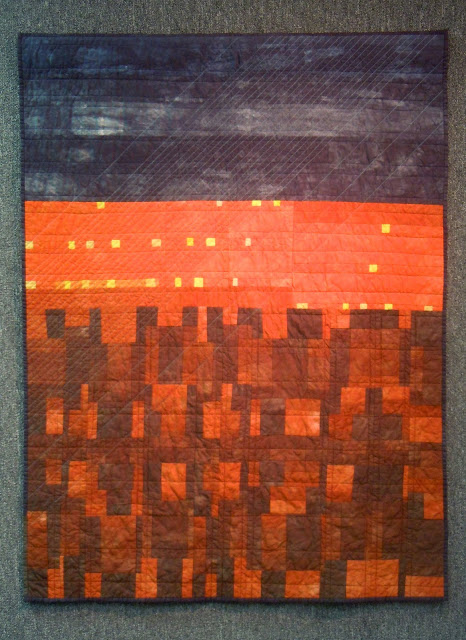
Landscape Series, 2010 to present
 |
| ocean. FL. DEC, 2011, approx. 40" x 50" |
 |
| sky. IA. JAN, 2011, approx. 40" x 50" |
 |
| fields. IA. JUL, 2011, approx. 40" x 50" |
 |
| sky. KS. AUG, 2011, approx. 40" x 50" |
 |
| fields. MO. DEC., 2011, approx. 45" x 60" |
 | ||||
| fields. KS. OCT., 2011, approx. 40" x 50" |
 |
| sky. KS. NOV., 2011, 65" x 72" |
 |
| Iowa Landscape Quilt 2010, 40" x 50" |
 |
| Iowa Landscape Quilt 2, 2010, 40" x 45" |
 |
| skyscape in blue and rust, 2010, 40" x 50" |
 |
| skyscape quilt in yellow and purple, 2010, 40" x 50" |
 |
| skyscape quilt in yellow and purple v. 2, 2010, 40" x 50" |
Binding Confession
 |
| What my binding used to look like. |
 |
| This is what my binding looks line now. |
It reached a point yesterday where I did something that I wish I hadn't. I machine sewed a binding. Ugh. As I was doing it, I thought two things: 1. This is going so fast. Yay! and 2. This feels wrong. I shouldn't be doing this.
 |
| Machine sewn binding (front of the quilt). |
But then, last night at quilt guild, I learned something that may change my life forever. Our president Jacquie (of Tallgrass Prairie Studio) showed us how she sews bindings that are invisible and much faster than the slip stitch. It's called the "Invisible Ladder Stitch". There is a great tutorial at Turning*Turning with pictures and instructions. This weekend I plan to tackle my stack of quilts and see how I do with the magic ladder stitch.
*I just finished reading The Happiness Project by Gretchen Rubin and started my own happiness project that I call "Kim's grow the f*** up project" and one of my personal commandments is "Do it right or pay the price" (which really means don't take shortcuts). If you don't know the book, go buy it or check it out at the library. I was a little put off by it at first because I feel like I already know everything she recommends doing. The hard part is actually doing everything. Once I stopped judging and being negative about it, I realized that I could definitely benefit from a lot of her ideas. One of my other commandments is "Don't be negative. Ever. About anything.".
Pillows!
A couple of weeks ago I made three pillows with some of my shibori fabric that had been sitting around. The fabric was originally meant to be used in quilts, but none of them came out quite right and I was feeling less than enthusiastic about making the quilts. I was still excited about the fabric and decided pillows were the answer.

They are each 16" x 16" and are lined and quilted in a pattern that compliments the shibori pattern.

There is an envelope style closure on the back so the covers can be removed and washed if they get icky (you know, spilled on or used as a cat bed).

Aren't they cute? I think so. It was a fun project and while I was making them I kept thinking "I could make a ton of these" but so far there are only the three.
new quilt in the making
I started a new quilt today on a whim. I went to my studio with a list of things to accomplish and instead, dyed the fabric for this quilt:

And this photo is just for fun. I always think the piles of scraps from trimming are so pretty. So this time I took a picture. This picture also shows the color a bit better. The light gray has a slight purplish cast to it and the greens aren't quite so acid.

Arrowmont = permagrin
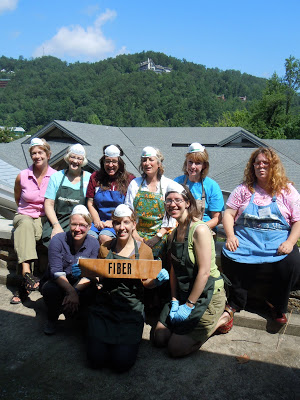 |
| My class and myself demonstrating effective use of a dust mask. |
Arrowmont is mostly known as a sort of art camp for grown ups. People from all over come to take week long art and craft workshops. I was there teaching a workshop on screen printing repeat designs on fabric. My students were all fabulous and blew me away with their enthusiasm and the amazing work they did.
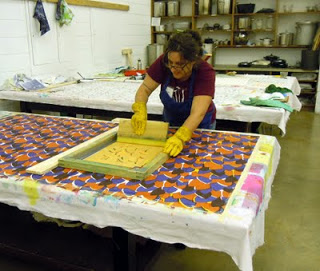
This is something I was working on during the week. One of the techniques I taught was using hand cut stencils made out of tyvek as an easy way to screen print. This interpretation of a Ralli Quilt was printed with dye from three separate hand cut stencils. I'm nerdy excited about the idea of printing traditional quilt blocks and instead of piecing a quilt top, printing it. I have at least two of these that I think will almost definitely be made into quilts in the near future. Maybe. We'll see. I might need to think about it some more.
Go to Arrowmont!!!
quilts on beds (gasp!)
Quilts go on beds, right? Those of you who know me, know that up until a year ago I firmly believed that my quilts were only for walls. Now, after making quilts specifically to be used for a year, I finally have a picture of one of my quilts on a bed. Tammy, in Iowa, commissioned my purple/yellow skyscape quilt in queen size earlier this spring. It is finally (almost) finished. I feel a bit guilty posting pictures of it here, when I should be getting it ready to ship, but I just couldn't hold in my excitement.
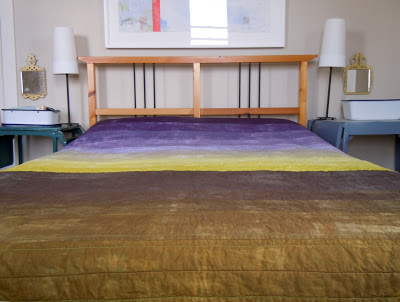
I am not a stylist. And I only have my own bed to use as a model. Taking photos of artwork is difficult enough, but taking these photos made me really appreciate how much work goes into styling a product (I feel a little sick for saying those words). If anyone at Crate and Barrel or Anthropologie or Dwell wants to be my friend I will trade them a quilt for help taking awesome pictures.
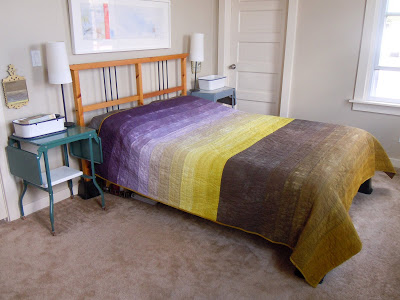
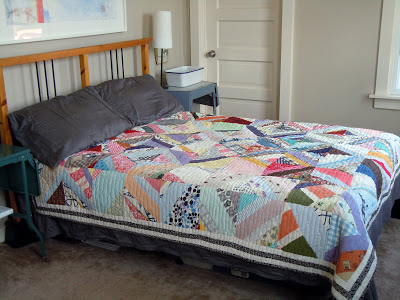
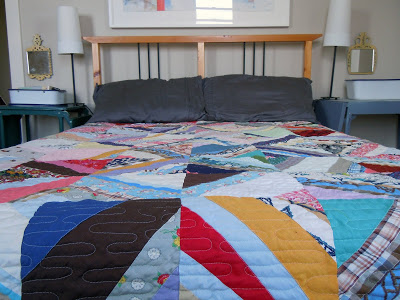
And now to show off my new summer quilt. The top was purchased at an estate sale or antique store by my mother in law ages ago. She had it quilted by a friend who also added the black and white border. It is fabulous. The first night it was on my bed, Owen the big fat cat jumped up for her nightly cuddles and immediately freaked out. She thinks the colors are alive. Poor Owen needs order.
pineapples!
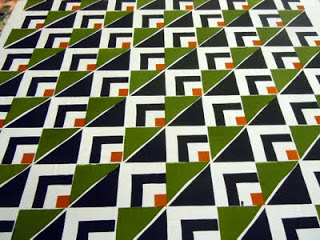
I have been working on so many different things lately and haven't posted in so long that it's quite difficult for me to decide what to share first. So...Pineapples!! Ever since going to the Textile Society of America conference this Fall and seeing the amazing International Quilt Study Center in Lincoln, I have been freaking out about traditional quilt patterns. Specifically Amish patterns and the Ralli quilts of Pakistan. Well, not freaking out so much as really really excited. In both of these quilt traditions solid colors (vs. patterned fabrics) and simple geometric shapes are the focus.
I'm trying to figure out how to express something new in traditional patterns. If not something new, then at least something "Kim". Sometimes I feel like it's impossible to improve on what has already been made because there have been so many amazing quilters and quilts around the world for hundreds of years. But I keep trying to remind myself that all I can do is try to express myself and make something honest and "Kim-ish" and hope that I can add to the history, not just repeat it.
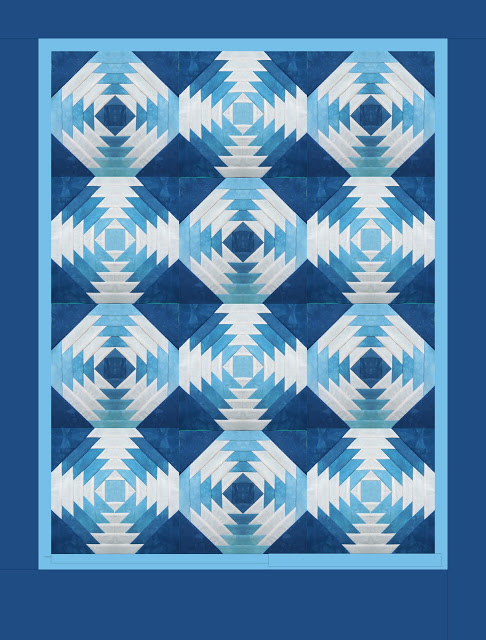
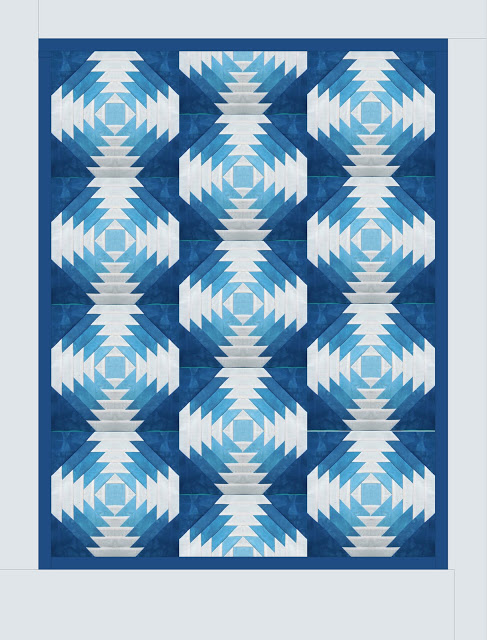
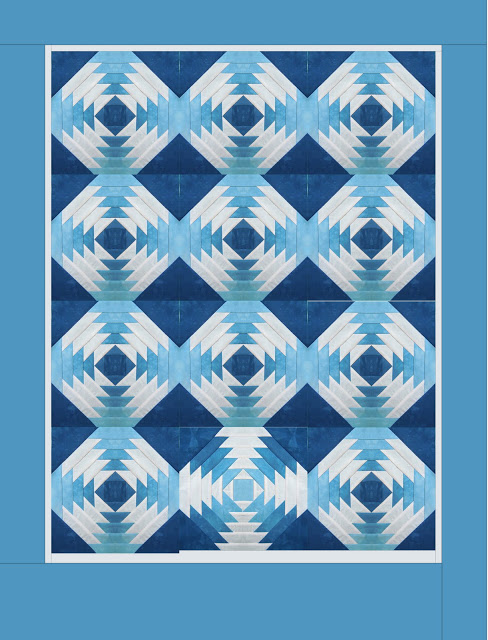
So - here are my attempts at Kim-izing the traditional Pineapple quilt. I'm playing around with my own hand dyed gradations, piecing and then simulating different quilts in Photoshop.
The blocks:
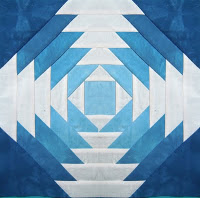
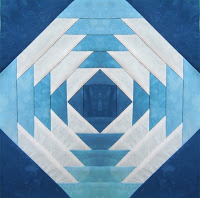
The patterns:
I'm trying to figure out how to express something new in traditional patterns. If not something new, then at least something "Kim". Sometimes I feel like it's impossible to improve on what has already been made because there have been so many amazing quilters and quilts around the world for hundreds of years. But I keep trying to remind myself that all I can do is try to express myself and make something honest and "Kim-ish" and hope that I can add to the history, not just repeat it.
So - here are my attempts at Kim-izing the traditional Pineapple quilt. I'm playing around with my own hand dyed gradations, piecing and then simulating different quilts in Photoshop.
The blocks:
The patterns:
the quilt that was supposed to be first but wasn't (or was it?)
Which came first?
#1

or #1?

Number 1 the first was the vision I had in my brain. Number 1 the second was how the vision manifested itself in the real world (after my tricky brain reconsidered her original idea and those pesky hands got in the way). Number 1 the first is the quilt that my brain wouldn't forget and wouldn't forget and wouldn't forget. So I had to make it eight long months after attempt #1. Sometimes you just have to make something. again.
A new look
So you might have noticed that I spruced things up around here. In the spring I get the decorating bug and right now it is manifesting itself as a desire to paint my living room Martha Stewart's "Salt Glaze" and possibly paint the kitchen cabinets (oh boy do I hate my cabinets. and my counters). Instead of doing all of that, I decided to update how my blog and website look. Did you notice the new banner up top? Did you notice that it matches the banner in my Etsy shop? Of course you did. You are very observant today.

This is the updated website. It is much less dark than before. I'm pretty pleased with myself. You might also notice that the quilt on the front page is one of my new small landscape quilts. They are slowly making their way onto Etsy and all four in finished form are posted on my website here. I am not a big fan of shameless self promotion, so this blog post feels a bit...er...awkward to me. But. I am trying to put into practice some of the things I learned in my Artist, Inc. class and through the helpful etsy blog about continuity and (gasp!) branding.
Quilt guild is tonight and my Robert Kaufman Kona Solids quilt is officially finished. Or it will be once it comes out of the wash.
I've been dreaming about big striped quilts lately. Like rugby shirts, but quilts. Hm...
What if I was einsy weinsy?
And Iowa was the quilt I pulled up over myself at night. Would it look like these?


Maybe.
(mini Iowa quilts in progress. finished mini Iowas coming soon)
three tops in three days
Oh boy. I am rich in quilt tops. There are currently six tops waiting patiently for me to quilt them (plus one that still needs binding). That means that this week (Spring Break!) should be spent quilting said tops. For some reason I am not looking forward to quilting them. Dyeing the backing fabric and binding, putting together the quilt sandwich, quilting, and binding are my least favorite steps. They're really not that bad and go relatively quickly, but they are just not as exciting as planning, dyeing the fabric, and piecing the tops.
Here is what's what:
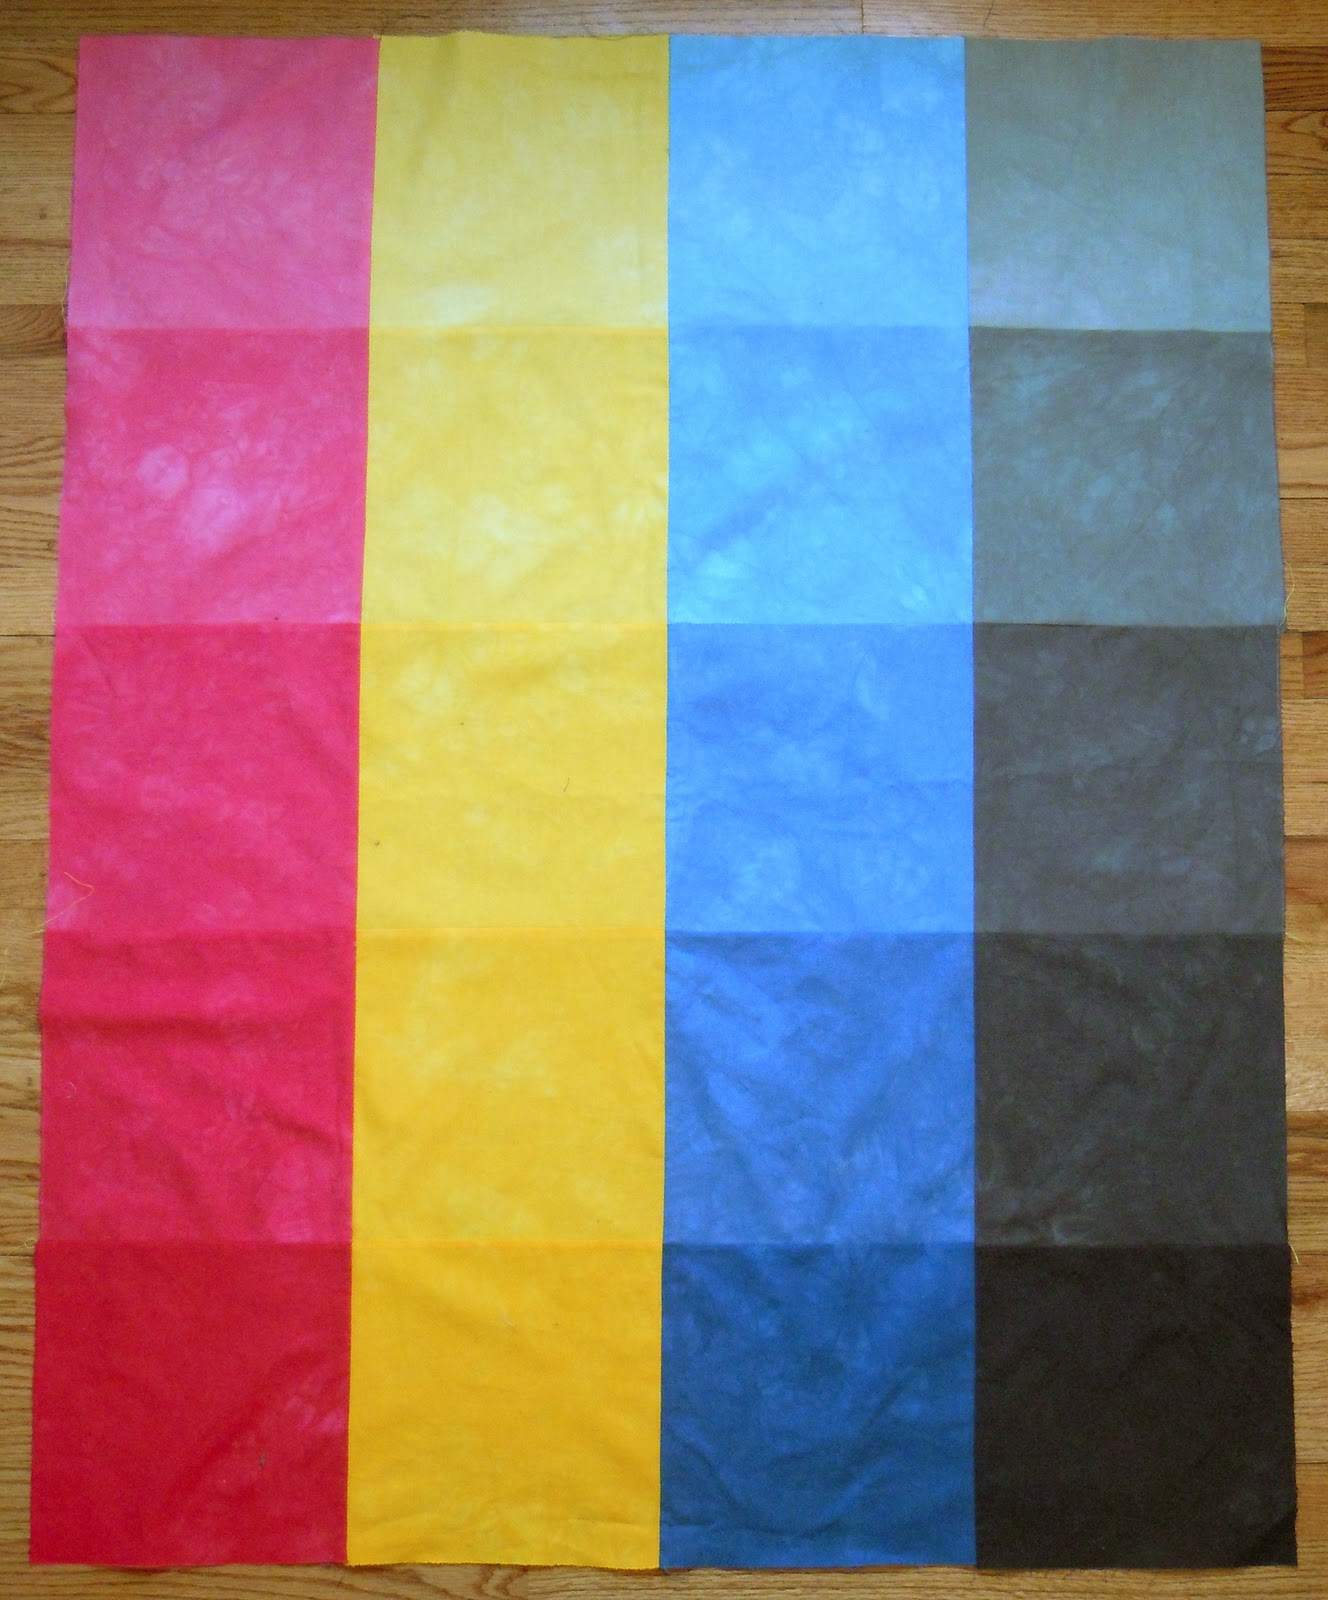

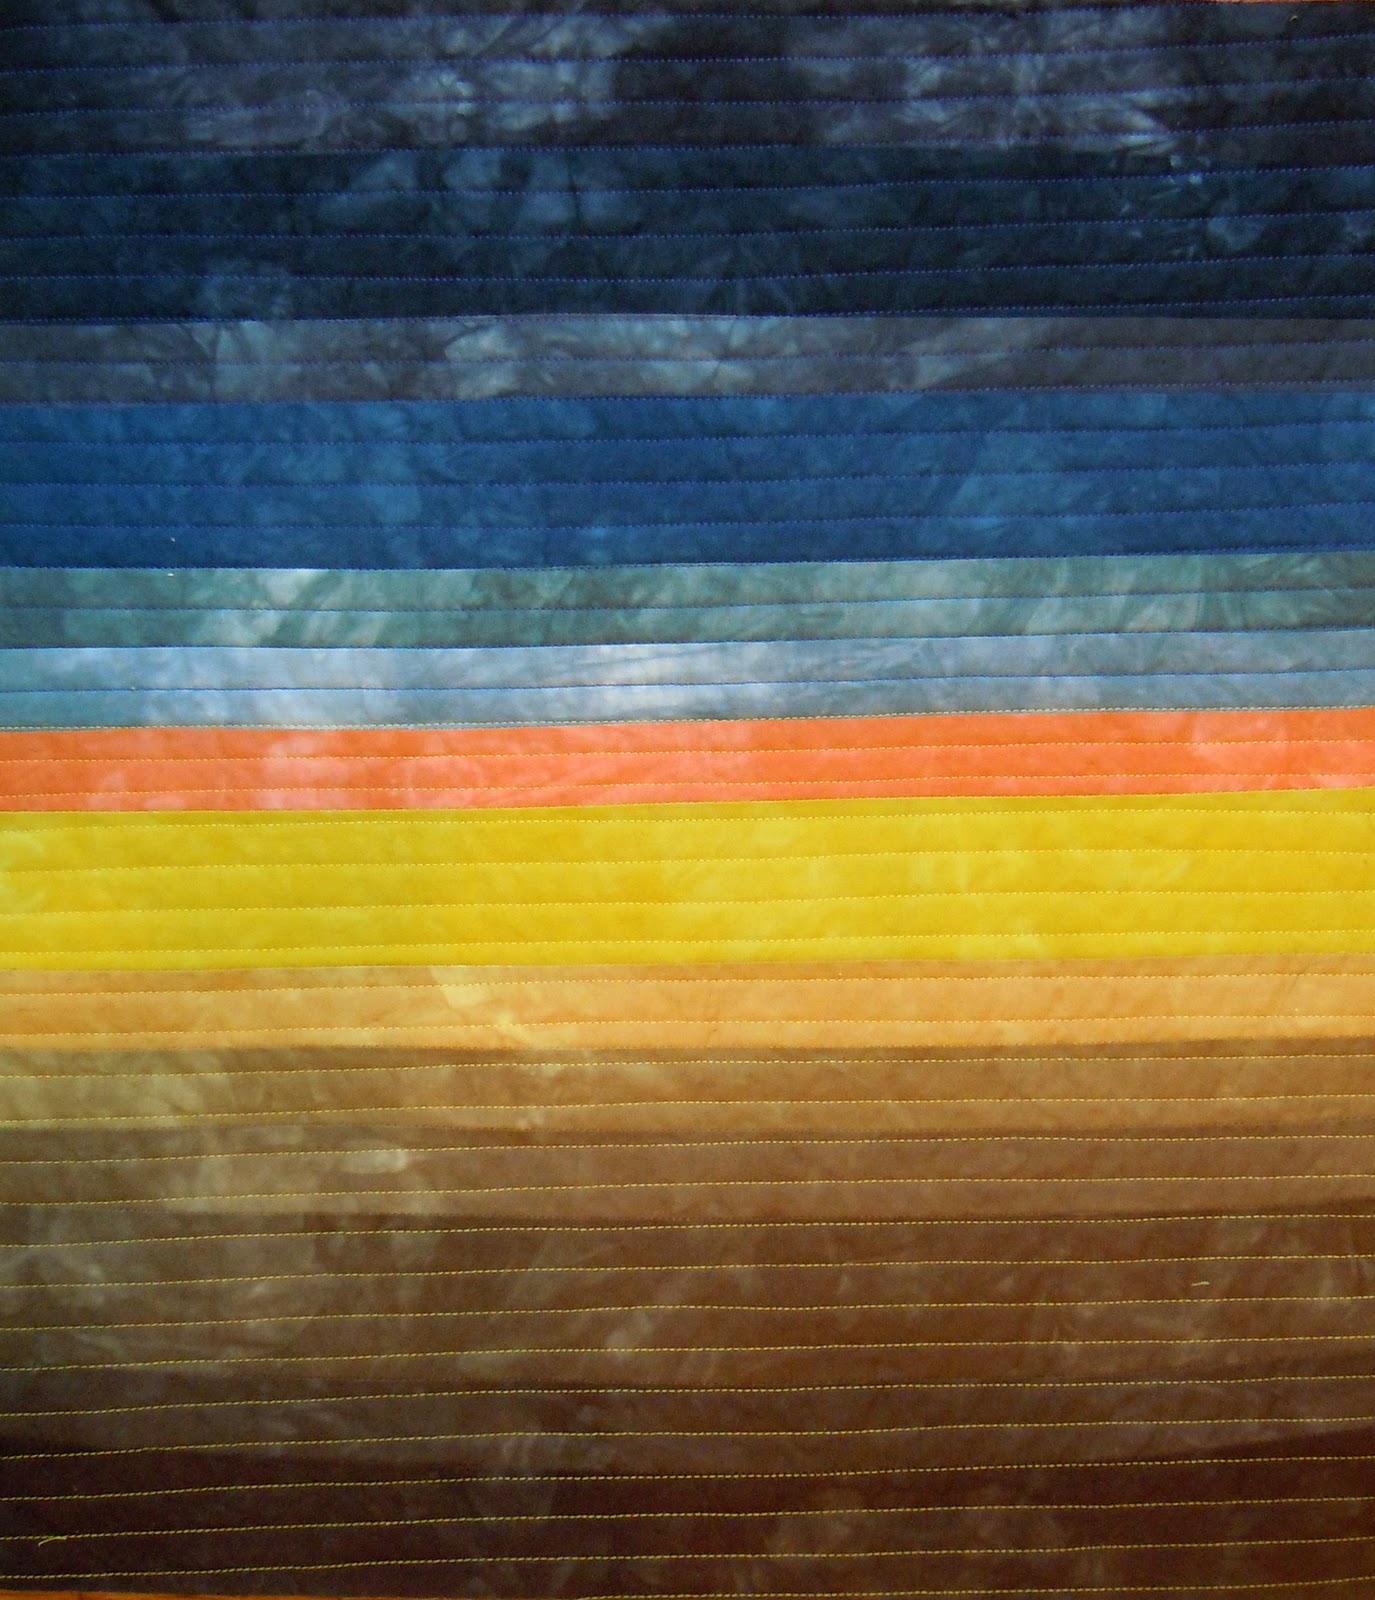
You might remember my plan to make a cmyk quilt? The photoshop sketch is on the bottom, the quilt top on the top. This quilt top was completed last night while watching Jersey Shore with my husband. I know you're jealous of my very exciting Saturday night. This quilt top is nerdy because cmyk are pure colors but to create the dye colors for the quilt I had to mix 8 different dyes. While I was dyeing the fabric I kept cracking myself up becasue I had to create my own primary colors by mixing them. Yes, I am a nerd. And very easily amused.


These are two sister quilts. The one on the bottom I made a while ago and is available in my etsy shop. I had left over fabric from this quilt (it was supposed to be twin sized but honestly, I got lazy) and I was inspired by my quilt guild to try some improvisational piecing. The new quilt top was made on Friday.

And this is my Robert Kaufman Kona Solids challenge quilt for quilt guild. From my charm pack of 43 "darks", I used 36 for the top in a very basic rainbow gradation. The remaining 7 colors will be included in the back of the quilt but didn't fit in my rainbow. This was my first attempt at using only commercially dyed fabric in a quilt and my first attempt at using block construction. It was finished just in time for me to brush my teeth and jump in the car to rush to quilt guild. I'm pretty happy with it.
A much needed trip to Our Nation's Capitol
I just got back from the best trip to visit my dear friend Kathryn who makes me laugh until I cry and then I cry for real when we say goodbye. She lives in Washington DC. It's quite unusual for me to take a trip to visit a friend during the school year. I'm usually way too busy and stressed out to go anywhere not family or school related. But Kathryn is getting ready to leave DC and I haven't seen her in about a year, so I made an exception and went on vacation. It was awesome.
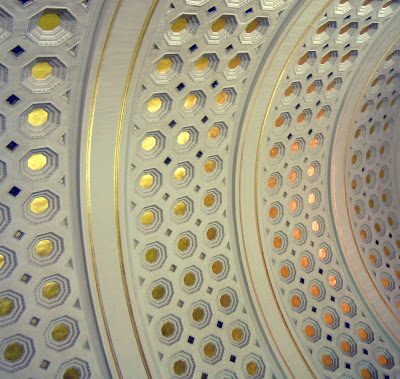 At times, I felt like a country mouse in the city. Most of you know I live in Kansas City, but Kansas City feels small and cozy to me compared to DC. There were so many people everywhere. Even the grocery store on rainy Saturday morning. I flew into Baltimore, then took a train to Union Station - the ceiling is shown above. The patterns in the architecture were truly inspiring.
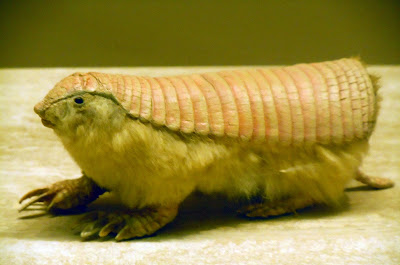 We went to the Smithsonian Natural History Museum and met the little guy above. He is a pink fairy armadillo. Really. I'm not kidding. It's real. It looks like my guinea pig (may she rest in peace) wearing alligator feet and a pink shell. It was also quite small - actually not much larger than guinea pig size.
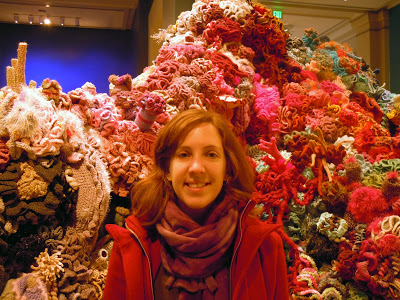 And I also got to see the Hyperbolic Crochet Coral Reef. It was huge and awesome. There were different parts of it to show how coral reefs die - like from bleaching and pollution. Very interesting. Since I suck at reading signs in museums I can't tell you many specifics, but their website will.
Most of all this trip made me step back and breathe for a few days. I get so wrapped up in Getting Sh*t Done and trying to Keep Up that I forget about what is important and what truly fuels my art practice. More than anything, I am inspired by life. How can I expect to create something great if I forget about the things that make living worthwhile? Like friendship, and pie, and possibly made up creatures, and walking in a strange city, and taking a breath once in a while. Right, yo?
Most of all this trip made me step back and breathe for a few days. I get so wrapped up in Getting Sh*t Done and trying to Keep Up that I forget about what is important and what truly fuels my art practice. More than anything, I am inspired by life. How can I expect to create something great if I forget about the things that make living worthwhile? Like friendship, and pie, and possibly made up creatures, and walking in a strange city, and taking a breath once in a while. Right, yo?
Robert Kaufman what are you doing to me?
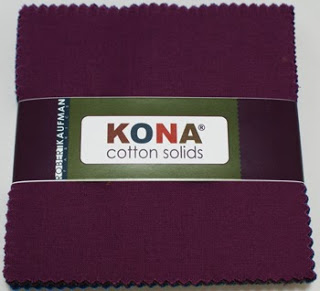
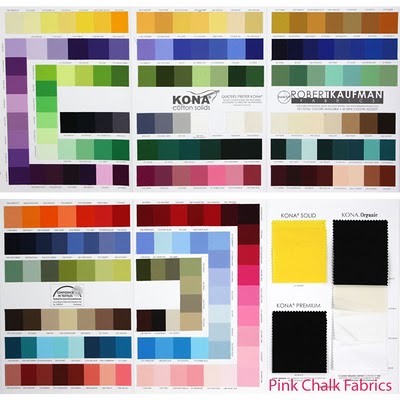
Oh my goodness, Robert Kaufman. Why do you make such beautiful, juicy kona cotton? And why must you have 221 incredible colors to choose from? And why did you tempt me into using them by donating charm packs for everyone in my quilt guild? Did you realize what this would do to me? Don't you realize that it takes me eight whole hours to make just a fraction of these by hand? Probably not. Are you even a real person, Robert Kaufman?
I'm totally having an existential crisis over this. Wouldn't it be nice if I could just pick fabrics out of a stack and not have to go through all the labor of making my own? It would make the whole process so much faster if I could skip the dyeing step. I wouldn't really say I'm losing sleep over this (it takes a lot for me to lose sleep over something) but I have been chewing on this issue since Thursday. I realized today that what it comes down to is I love dyeing fabric. It is my favorite part of making a quilt. I love making different color combinations, weighing the fabric, figuring out the equations, mixing stock solutions, adding small amounts of dye to a dyebath with a tiny syringe. It's all fun and interesting and always a different challenge. So, yes. It would be much easier to buy these incredible Kona cottons. But it wouldn't be as satisfying, and I wouldn't be in control of the colors, they would always be someone else's.
But seriously, y'all. All I could do Thursday night was fondle my charm pack and flip through all 43 little 5" squares, constantly trying to find my favorite in the bunch. These kona cottons are so beautiful and the people at Robert Kaufman are so generous.
meep meep moop. sorry for the neglect.
Poor little blog has been sitting here all by herself for months with no Kim. I have been such a strange combination of too busy and too lazy this winter. Everything was going well before Christmas. I was excited to be on winter break and I had a big project to work on (a twin size skyscape quilt). Then some stuff happened that turned me lazy (including snow). Now I only have a week and a half until spring semester and I am freaking out, yet still unable to get off my ass and make something. There are too many ideas in my head and not enough time to execute them all, so I find myself sitting around and looking at Etsy and worrying and watching True Blood instead of just working.
Maybe if I write out my ideas here, that will start something going. Right?
1. More paint chip quilts - focus on color theory
2. Skyscape/Landscape quilts using silk and linen based on my winter sky photos
3. Different patterns (embrace the triangle)
I have been a little productive. I'm re-making the Orange Paint Chip quilt and the Purple/Yellow Skyscape quilt. The tops are done, I just need to dye the backing and binding, and then quilt them. I also made these sketches in Photoshop:
This one is RGB, the green/blue column is a bit off - too gray.
Here we have CMYK (but it's really MYCK)
This is a modified color wheel. I'm not so good at color blending in Photoshop, but the colors are supposed to mix and become more neutral in the middle.
The End. For now, but hopefully not for long.
inspiration: the sky from my bedroom window
Every morning I open the curtains in my bedroom so the sun will help Simon wake up. For a while it was dark when I did this. But with the time change it has been getting light out while I'm still at home and every morning right around 7:10 the sky is amazing.
 |
| 11/21 - do you see that jet stream? |
I mean truly honestly amazing. Shockingly so. I am still trying to figure out why the sky is such a revelation to me, when it has been around my whole life.
 | ||||
| 11/10 |
The night sky is pretty great, too. I guess.
 |
| 11/18 |
 |
| 11/19 |
I am completely awed by the difference in cloud structure, color, quality of light, and mood within a span of a few days. These skies only exist for a short amount of time, so unless you are really paying attention, they are easy to miss. If I wasn't such a slave to time, I would wake up with the sun every morning and take a picture. A project for winter break perhaps.
cough, cough, etsy, cough
I am officially a Sicky McSickerton with runny nose, cough, headache, and general unpleasantness. It's no fun. It's hitting especially hard now that I am back home in KC, away from The Most Adorable Nephew Ever.
Instead of an invitation to my pity party, I will leave you all with a very short blog post and some eye candy. Check out this treasury I made on Etsy.
Sneak peeks:

Again, the link for the treasury with a side note that anyone who wants to send me a Christmas present need look no further than this delightful list (hint, hint, no pressure).
Instead of an invitation to my pity party, I will leave you all with a very short blog post and some eye candy. Check out this treasury I made on Etsy.
Sneak peeks:
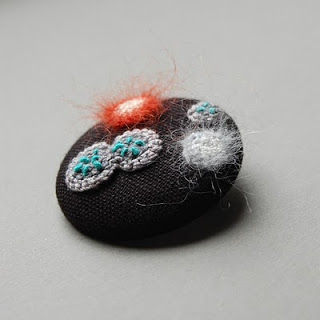
Moldy Linen Pin by elinart
Quilt Card Set by krankpress
Again, the link for the treasury with a side note that anyone who wants to send me a Christmas present need look no further than this delightful list (hint, hint, no pressure).